PositionMaker(iPhone版)ユーザーマニュアル v1.1.0
ダウンロードありがとうございました!
一通りの使い方をまとめてみました。
何か分からないことや要望等があったら、コメントを残していただけるとありがたいです。
管理画面

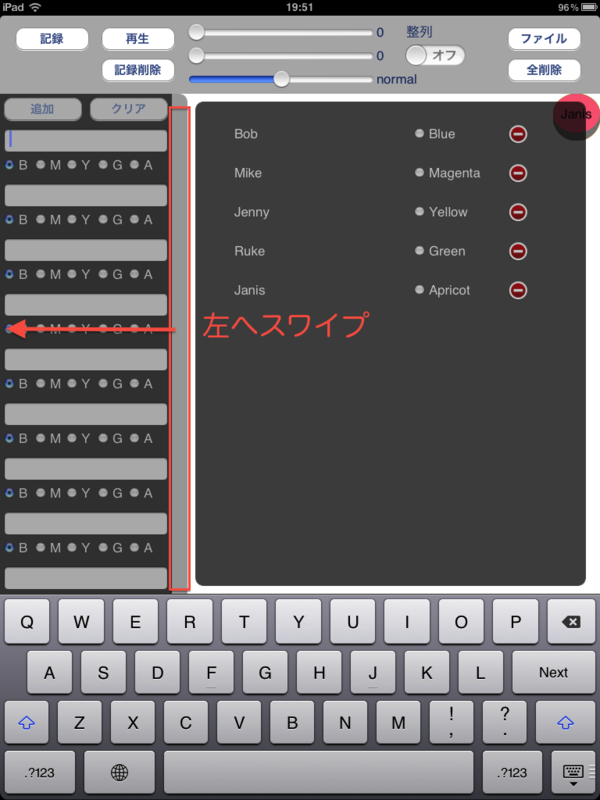
テキストボックスに名前を入力し、色を選び、追加ボタンをタップして下さい。
クリアボタンを押すと全ての名前がクリアされますのでご注意を。

メンバーを追加すると右側の画面にリストが表示されます。
リストからメンバーを削除するには、管理画面を左にスワイプし、右端の赤いボタンをタップして下さい。
管理画面を終了するにはもう一度ツールバー左端のボタンをタップして下さい。
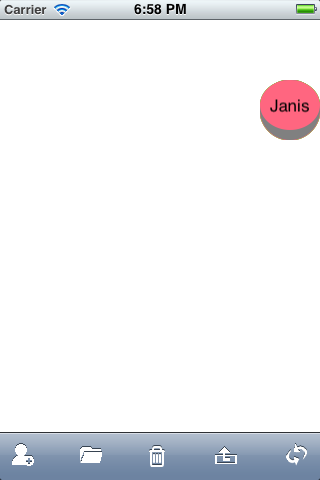
管理画面でメンバーを追加すると画面右上に丸いオブジェクト(フィギュアと呼びます)が表示されます。
フィギュアには先程入力した名前が表示されています。
記録機能
記録機能を使ってみましょう。
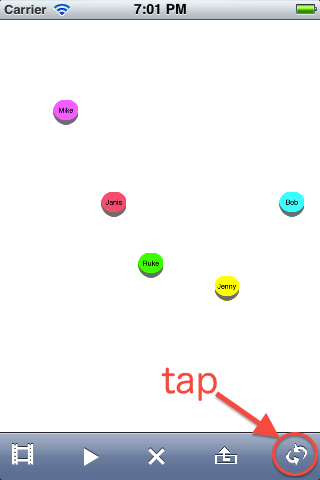
ツールバー右端のボタンをタップするとメニューが切り替わります。
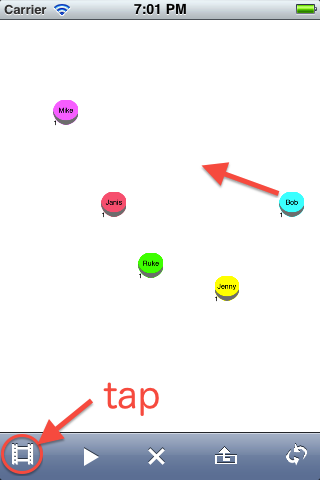
ツールバー左端の記録ボタンをタップして下さい。
それぞれのフィギュアの左下に数字が表示されます。
数字はそのフィギュアがいくつの位置を記録しているかを表しています。
Bobを移動すると数字が増えるのが確認出来ます。
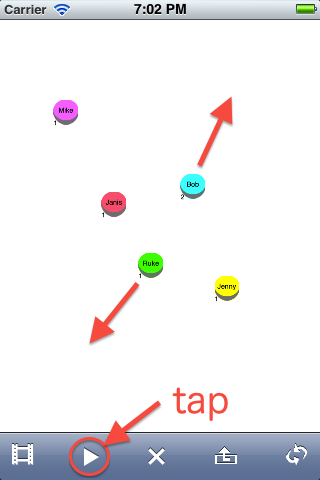
さらにBobとRukeを移動してみましょう。
最後にもう一度記録ボタンをタップし、隣の再生ボタンをタップして下さい。
BobとRukeが記録した位置を順番に移動します。
真ん中のボタンをタップすると記録が削除されます。
整列機能

ツールバーの右端のボタンをタップしてメニューを元に戻し、右から二番目のボタンをタップします。
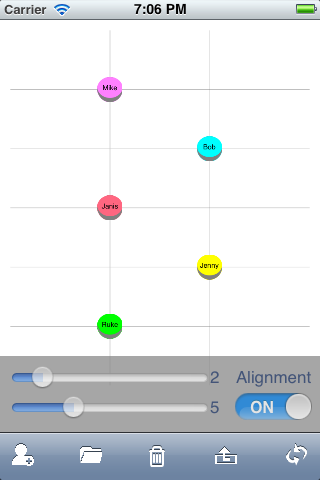
表示されたスライダーでいくつ線を引くか決めます。
上のスライダーは縦線、下のスライダーは横線の数を変更します。
その後、整列スイッチをタップしオンに切り替えて下さい。

整列機能を確認する為にBobを動かしてみて下さい。
Bobが線の交点に配置されるはずです。
複数選択
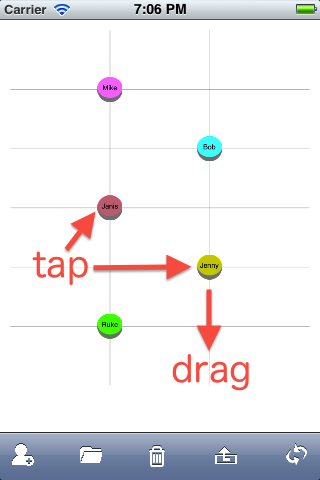
たくさんのフィギュアを表示すると、移動するのが大変です。
複数のフィギュアを順番にタップし、ドラッグ&ドロップすることが出来ます。
選択されているフィギュアは色が濃くなります。
選択を解除するにはもう一度タップして下さい。
何もないところをタッチすると全ての選択が解除されます。
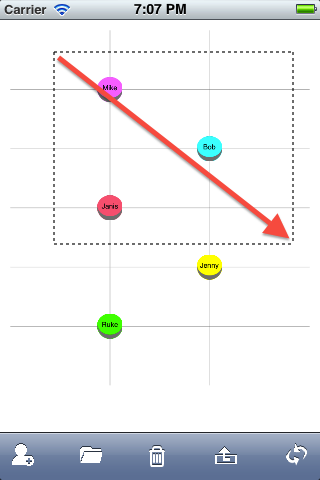
何もないスペースでダブルタップ&ドラッグすると、範囲指定選択をすることが出来ます。
破線の内側のフィギュアが選択されます。
セーブ&ロード
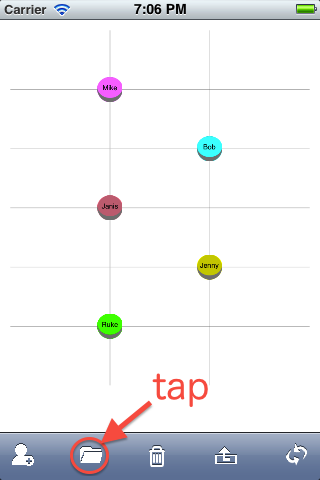
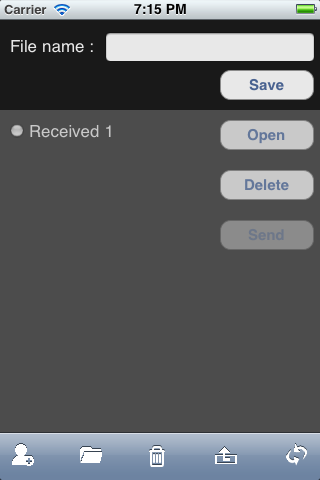
画面右上のファイルボタンをタップすると、ファイルメニューが表示されます。

ロードするには記録されたファイルを選び、開くボタンをタップして下さい。
ファイルを削除する際は削除ボタンをタップします。
送信

v1.1.0からの新機能として、iOSの端末同士でファイルを送受信出来るようになりました。
※送受信機能を使う場合は、事前に設定->一般->Bluetoothをオンにして下さい。
近くにiOS端末が2台以上ある状態でそれぞれのファイルメニューを開きます。
しばらくすると送信ボタンがアクティブになります。
アクティブにならない場合はファイルメニューを開き直してみて下さい。

送信ボタンを押すと受信側でポップアップが出るので、名前を付けて保存して下さい。
全削除

ツールバーの真ん中にある全削除ボタンをタップすると、確認のポップアップが表示されます。
実行すると全てのフィギュアと移動の記録が削除されます。
やり直しは出来ないので、必要なデータは削除前にセーブしておいて下さい。
最後に...
ここまで読んでいただき、ありがとうございます!
使い方が分からなかったり、機能の要望があればコメントを残してもらえるとありがたいです。
仕事の合間になってしまうのでレスは遅いかもですが、必ず目を通します。
すごくマニアックなアプリだと思いますが、何かの助けになれば幸いです。
How to use PositionMaker on iPhone v1.1.0
Thank you for downloading my app!
If you have any questions about my app and/or this article,
please feel free to leave comments.
Tutorial
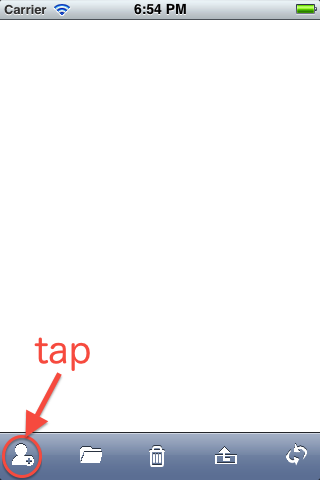
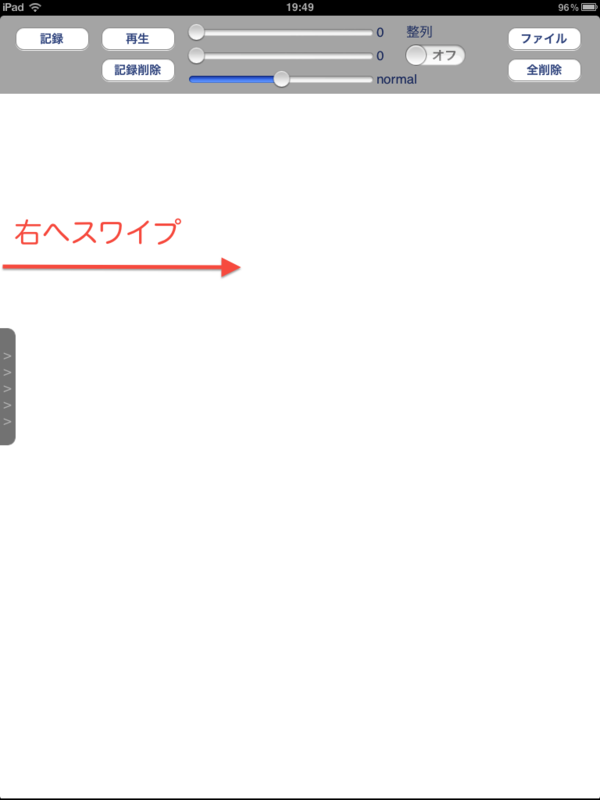
This is a screenshot of what you see
when the app is running.
Let's tap the button on the left end of
the toolbar. You'll see the "Management
View".
Management View
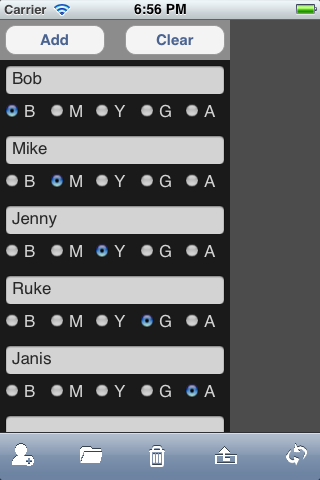
Type out names, select colors, and then
tap the "Add" button.
Please care to use The "Clear" button,
that will erase all names you typed.
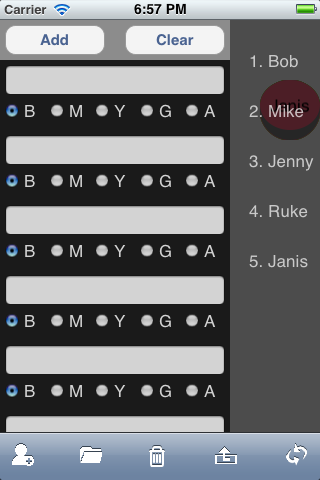
Once you add members, the right-hand
gray view shows the list of members on it.
When you want to delete someone,
swipe the gray view to the left and just
tap the red thing with white bar on the
list.

To quit the "Management View", touch
the button again.
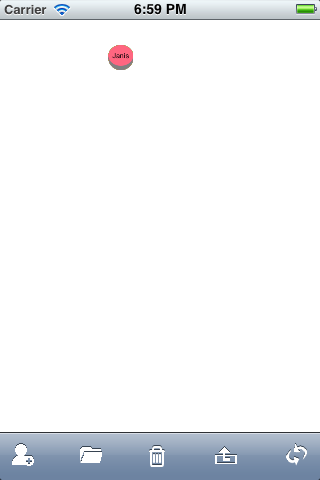
You will see A round figure on the upper right.
Those figures are labeled as you type.
Double tap the white area to zoom down.
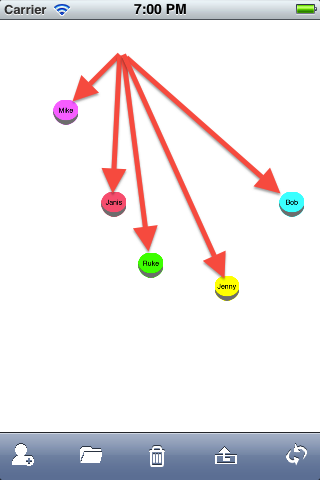
Drag and Drop those like this.
Recording

Let's start recording.
Tap the button on the right end of the
toolbar to change buttons on it.

Tap the "REC" button on the left end of
the toolbar to start recording.
You'll find a number on the lower left of each figures.
Those numbers show "how many
movements the figure has".
Let's drag Bob to the center, and check
the number increases.

Again, drag/drop Bob and Ruke.
Finary, tap the "REC" button to stop
recording and the "Play" button on the
next to see how it works.
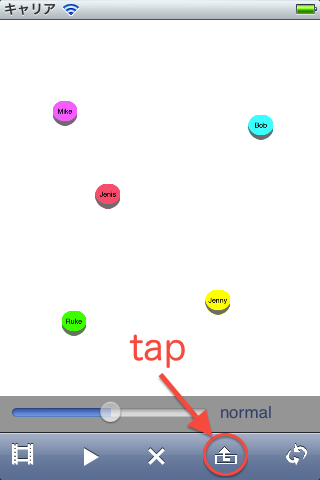
Tap the button on the 2nd from the right end.
You can change the speed of movement by the slider controller.
Alignment
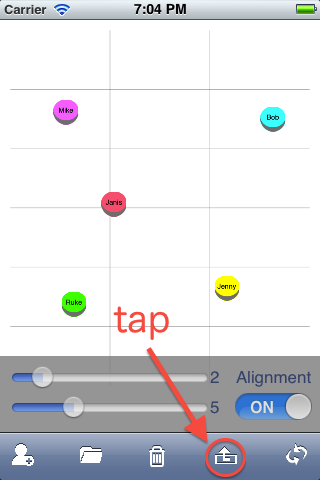
Tap the button on the right end to
change the menu.
Then, Tap the button on the 2nd from
the right end.
Drag the slider controller to decide how many lines you want.
The upper is for vertical lines, the other is for horizontal ones.
After that, tap the "Alignment" toggle switch to activate the alignment function.
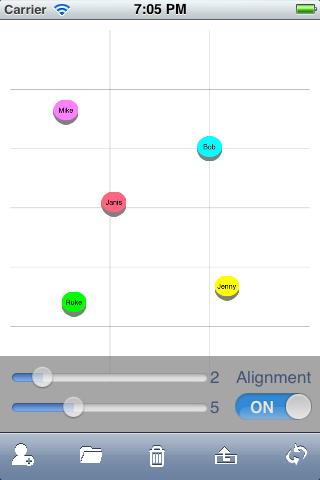
It's easy to see the difference when you move Bob.
Bob might skip to the nearest intersection.
This is what the alignment function does.
Selecting multiple figures

Only one figure can be dragged at once? No way.
Just tap figures one by one, then drag/drop one of those.
Selected figures are grayed.
To cancel the selection, tap the figure
you want to deselect.
Note that a tap on the empty space
cancel all selections.

When you double tap & start dragging
from the empty space, you can select by
area.
Figures inside the rectangle with dashed line are going to be selected.
Save and load

The "File" button on the 2nd from the left end is to show the "File Menu View".
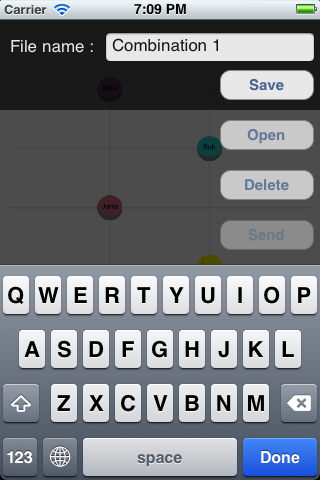
Names, positions and movements will be saved.
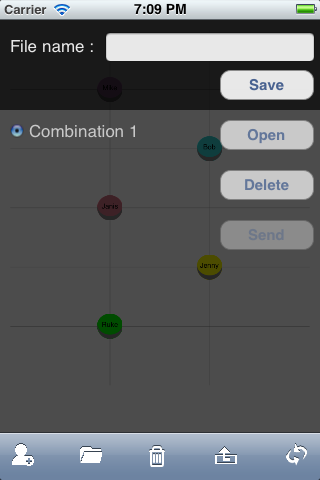
To load a file, tap a file to select, then tap the "Open" button.
Use The "Delete" button to remove the file selected.
Send Files
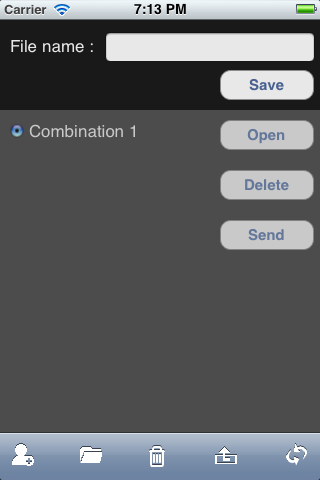
Since version 1.1.0, you can send/receive a file via Bluetooth!
(make sure Settings->General->Bluetooth is ON)
When 2 or more iOS devices are nearby, tap the "File" button of all of them.
Before long, "Send" button will be enabled.
If not, re-open the File Menu View.
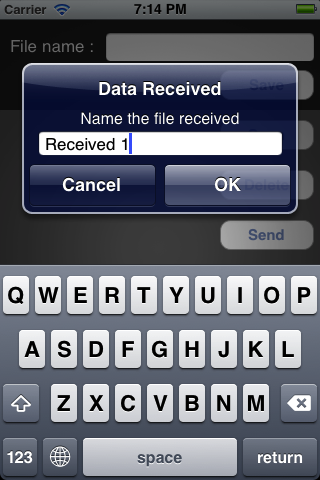
Tap the "Send" button.
Then this popup will be shown on the receiver.
Name the received file.
Clean up
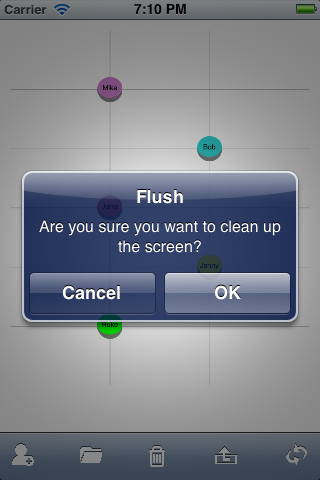
You will see this confirmation to use the "Flush" button on the center of the toolbar.
This function deletes all figures and recordings at once.
It cannot be undone, so please be sure to save those into a file before you fire it.
At the last...
If you have any questions, please leave a comment.
New ideas for improvement are welcome!
I'm developing very slowly, though...
I hope you enjoy it!
How to use PositionMaker v1.1.0
Thank you for downloading my app!
If you have any questions about my app and/or this article,
please feel free to leave comments.
Tutorial
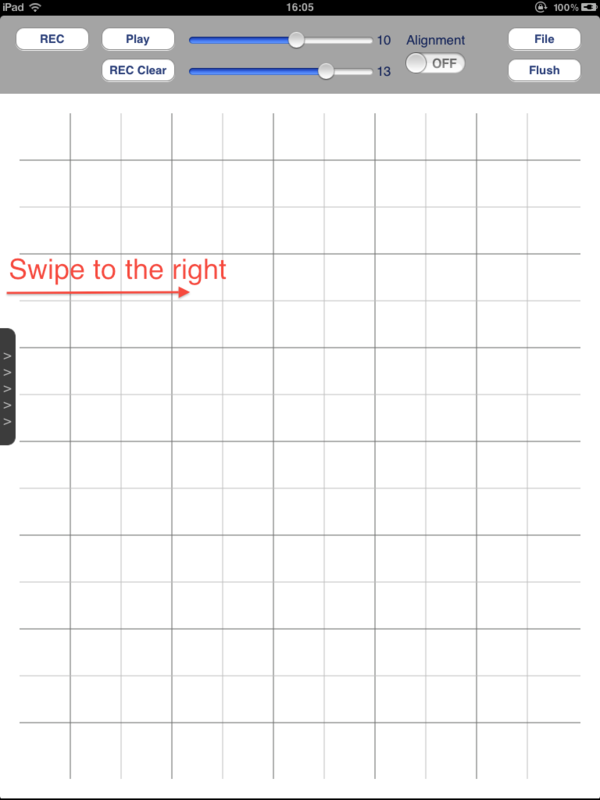
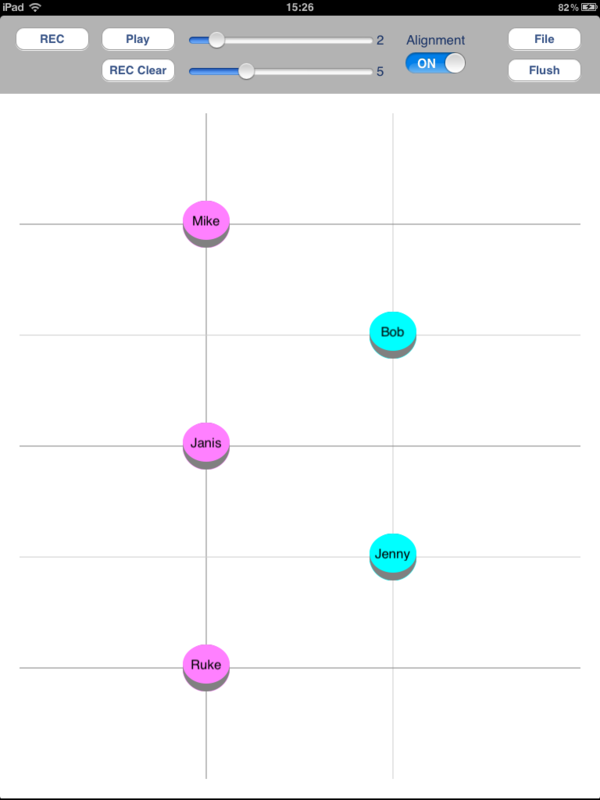
This is a screenshot of what you see when the app is running. (maybe no vertical and horizontal lines)
Let's swipe the white area from the left end to the right. You'll see the "Management View".
Management View
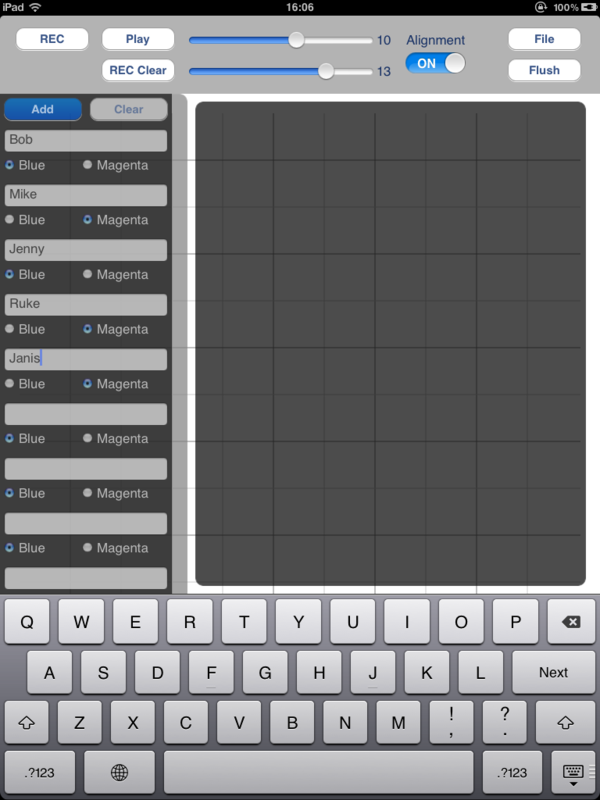
Type out names, select colors, and then tap the "Add" button.
Please care to use The "Clear" button, that will erase all names you typed.
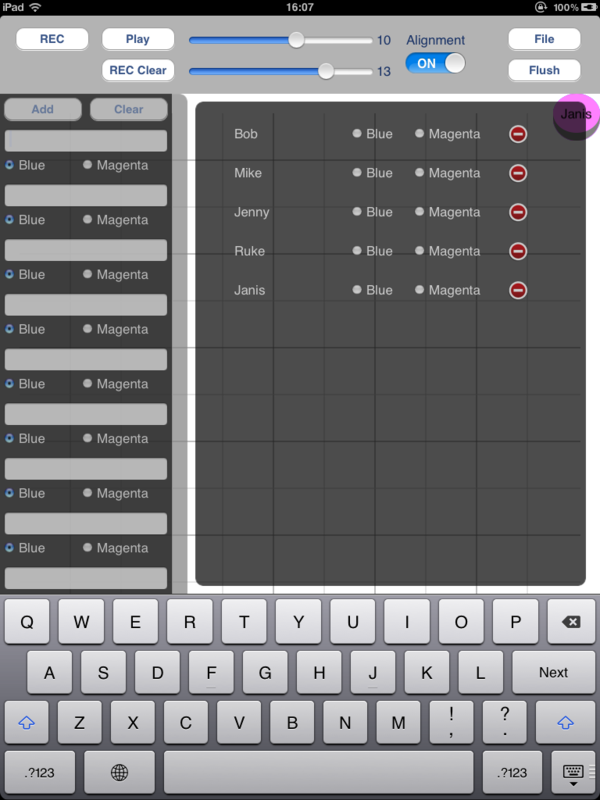
Once you add members, the right-hand gray view shows the list of members on it.
When you want to delete someone, just tap the red thing with white bar on the list.
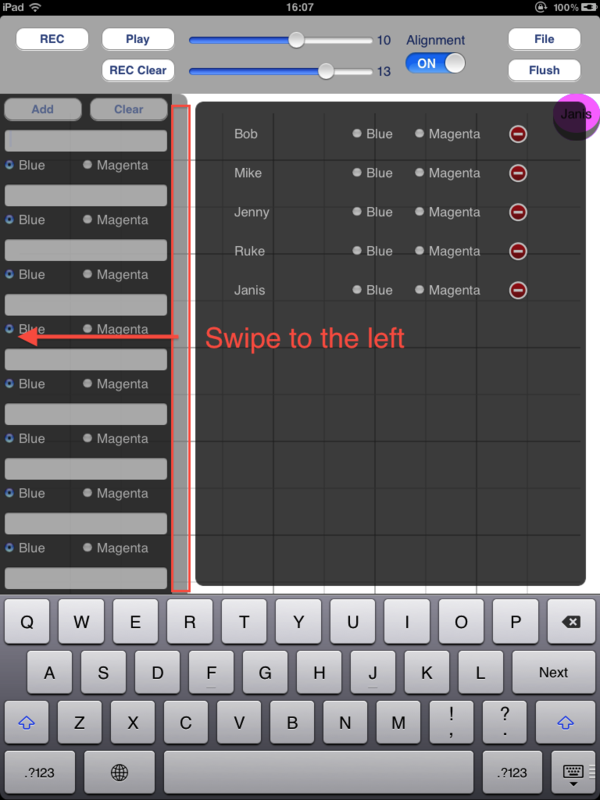
To quit the "Management View", touch the light gray zone and swipe to the left.
Recording
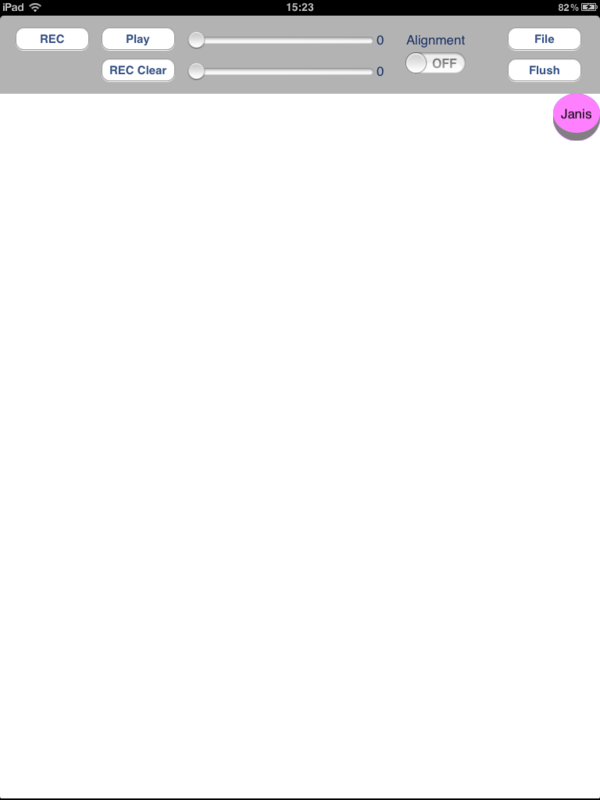
Let's start recording.
You will see A round figure on the upper right.
Those figures are labeled as you type.
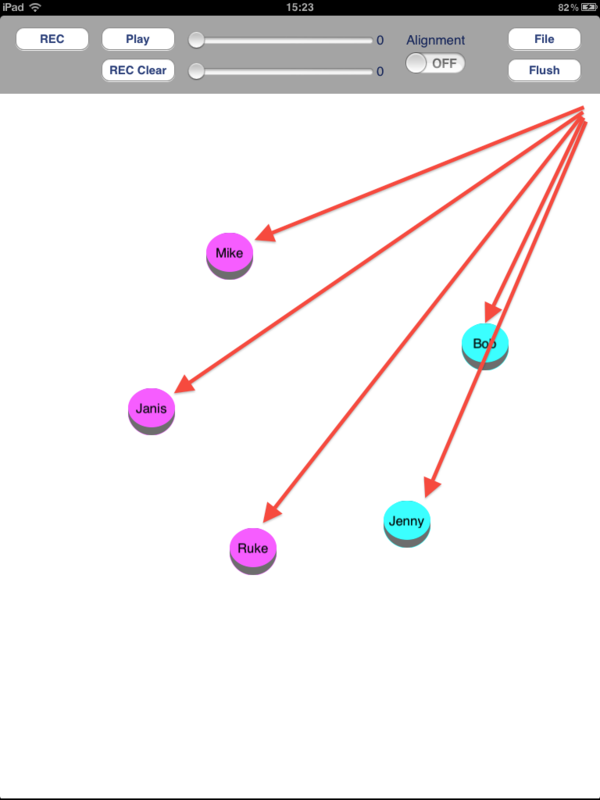
Drag and Drop those like this.
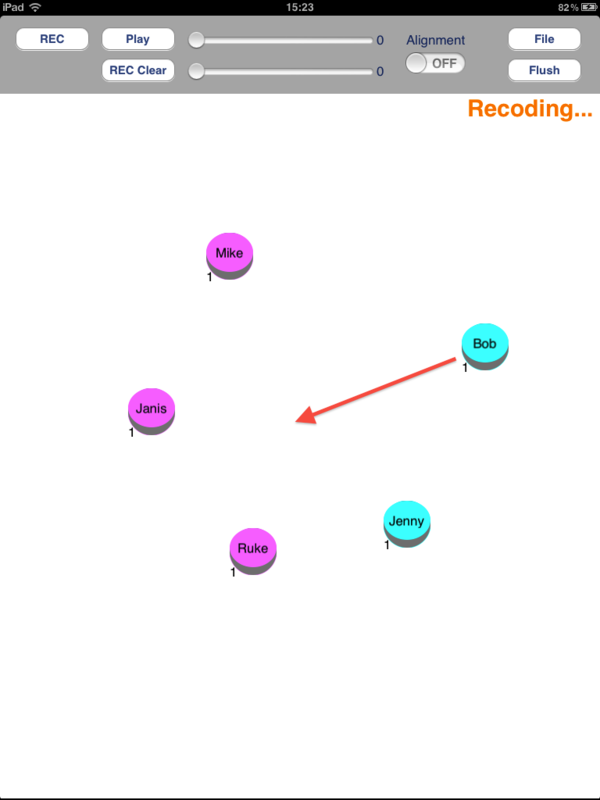
Then tap the "REC" button to start recording.
You'll find a number on the lower left of each figures.
Those numbers show "how many movements the figure has".
Let's drag Bob to the center, and check the number increases.
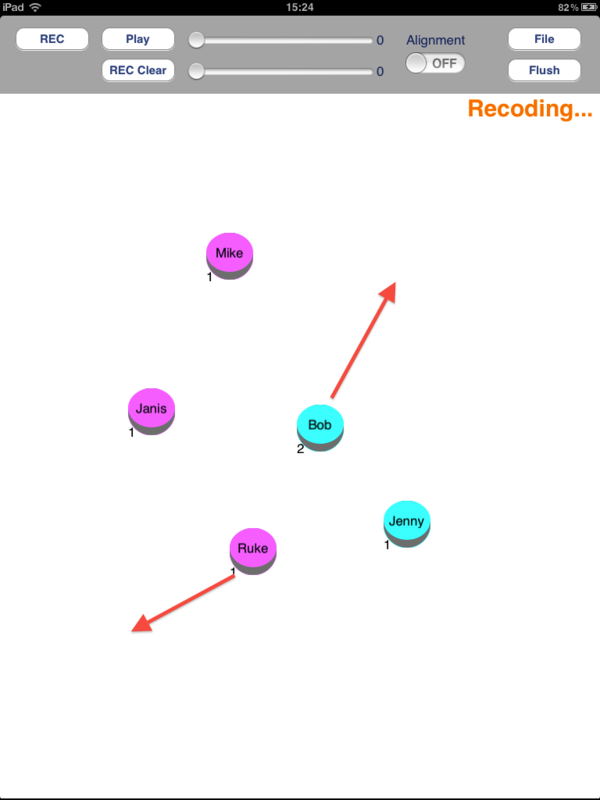
Again, drag/drop Bob and Ruke.
Finary, tap the "REC" button to stop recording and the "Play" button to see how it works.
Alignment
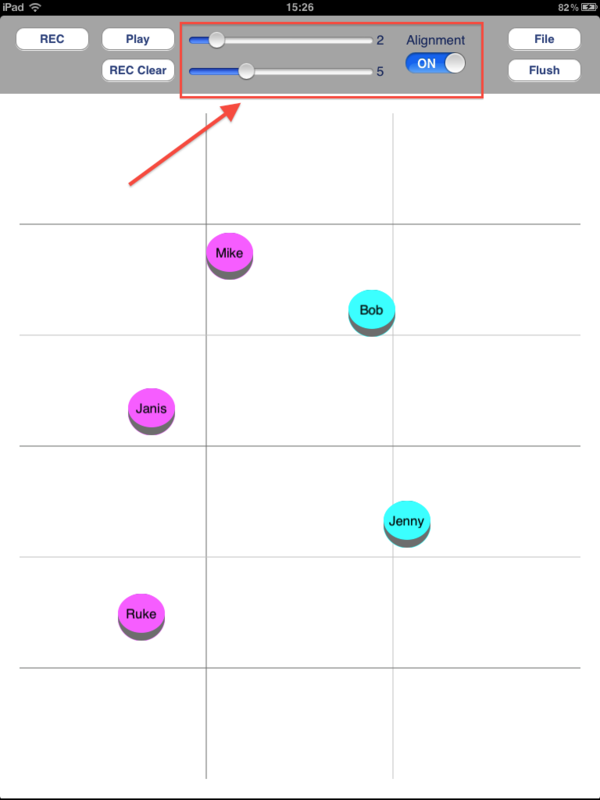
The alignment function is helpful if you want to align those figures on a line.
Drag the slider controller to decide how many lines you want.
The upper is for vertical lines, the other is for horizontal ones.
After that, tap the "Alignment" toggle switch to activate the alignment function.
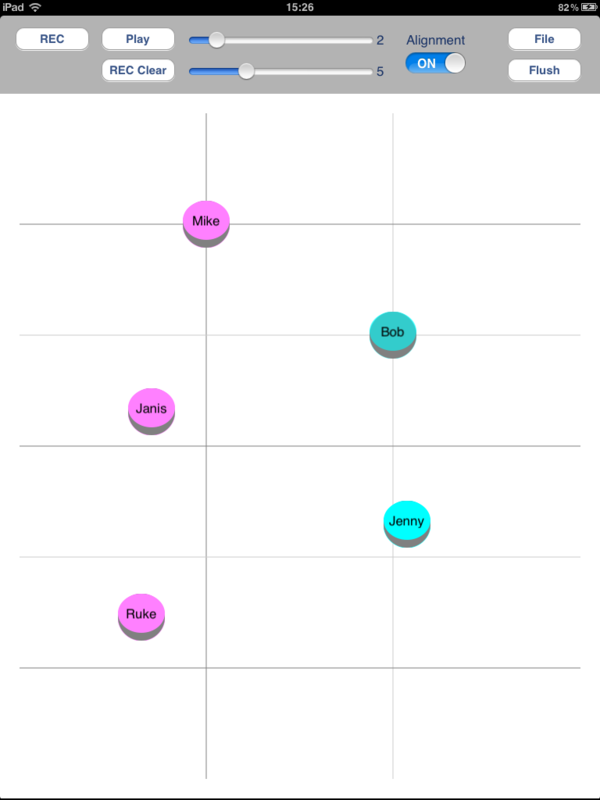
It's easy to see the difference when you move Bob.
Bob might skip to the nearest intersection.
This is what the alignment function does.
Selecting multiple figures
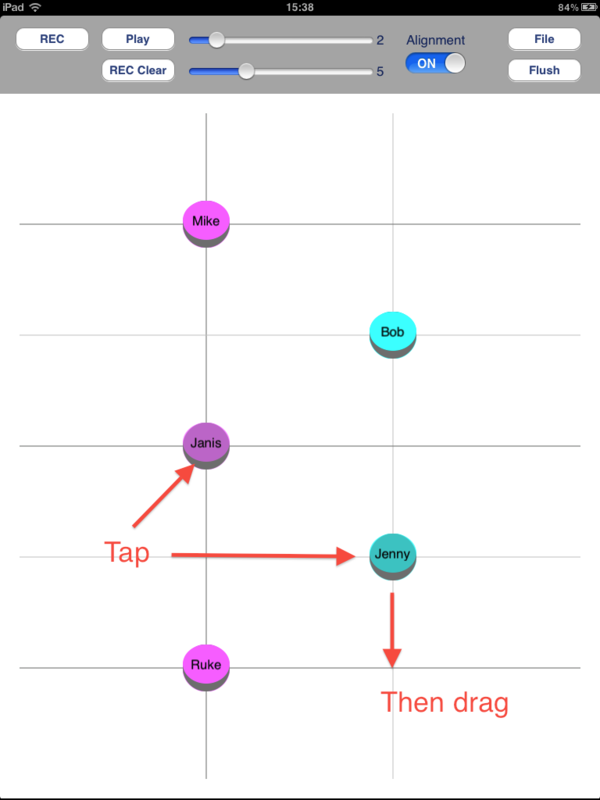
Only one figure can be dragged at once? No way.
Just tap figures one by one, then drag/drop one of those.
Selected figures are grayed.
To cancel the selection, tap the figure you want to deselect.
Note that a tap on the empty space cancel all selections.
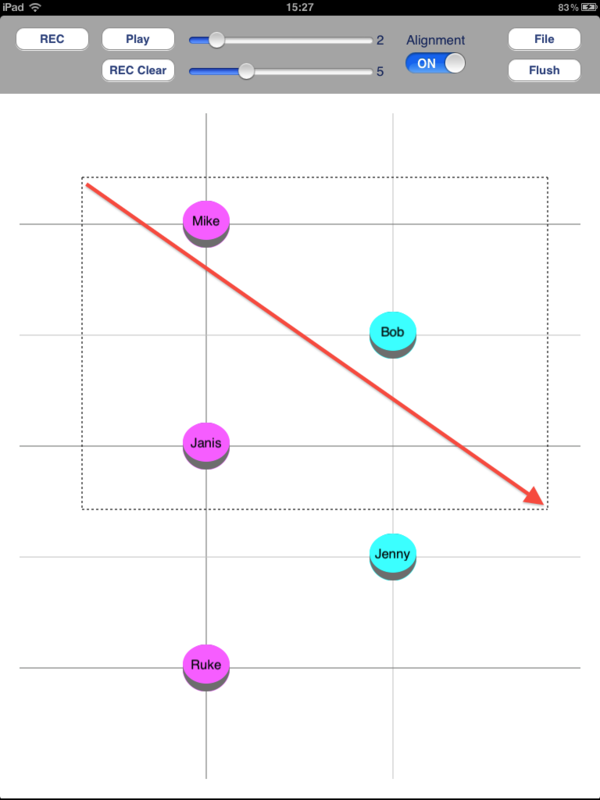
When you start dragging from the empty space, you can select by area.
Figures inside the rectangle with dashed line are going to be selected.
Save and load
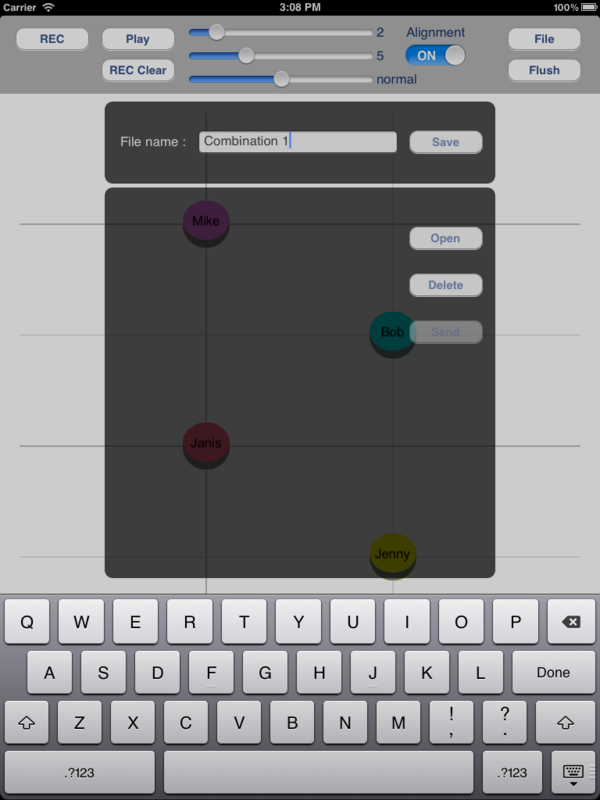
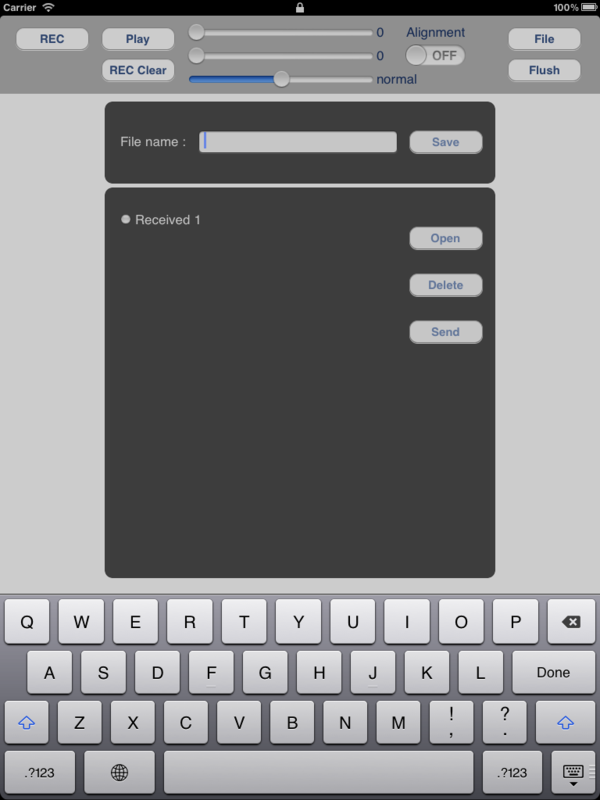
The "File" button on the upper right is to show the "File Menu View".
Names, positions and movements recorded will be saved.
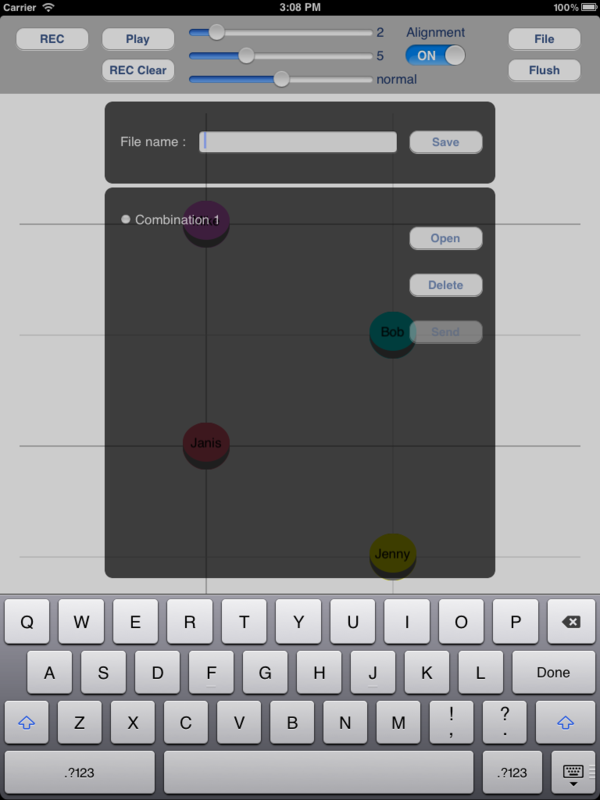
To load a file, tap a file to select, then tap the "Open" button.
Use The "Delete" button to remove the file selected.
Send Files
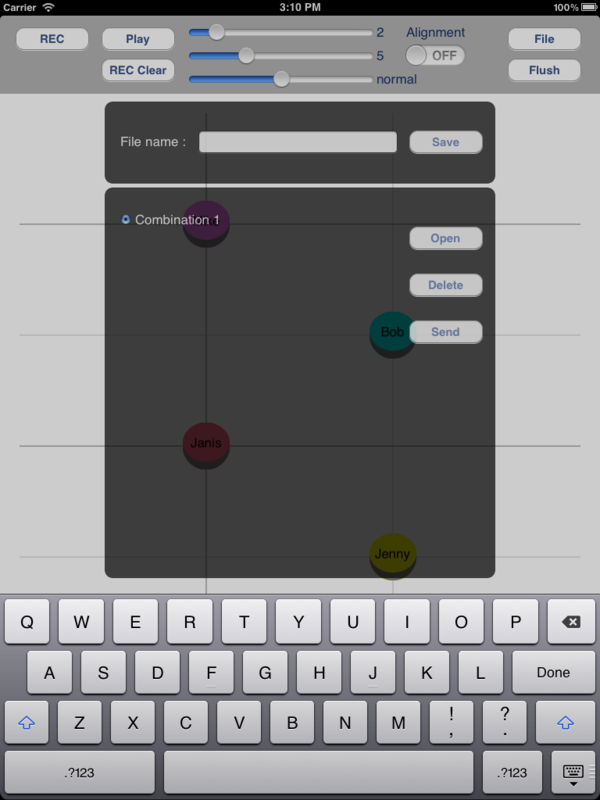
Since version 1.1.0, you can send/receive a file via Bluetooth!
(make sure Settings->General->Bluetooth is ON)
When 2 or more iOS devices are nearby, tap the "File" button of all of them.
Before long, "Send" button will be enabled.
If not, re-open the File Menu View.
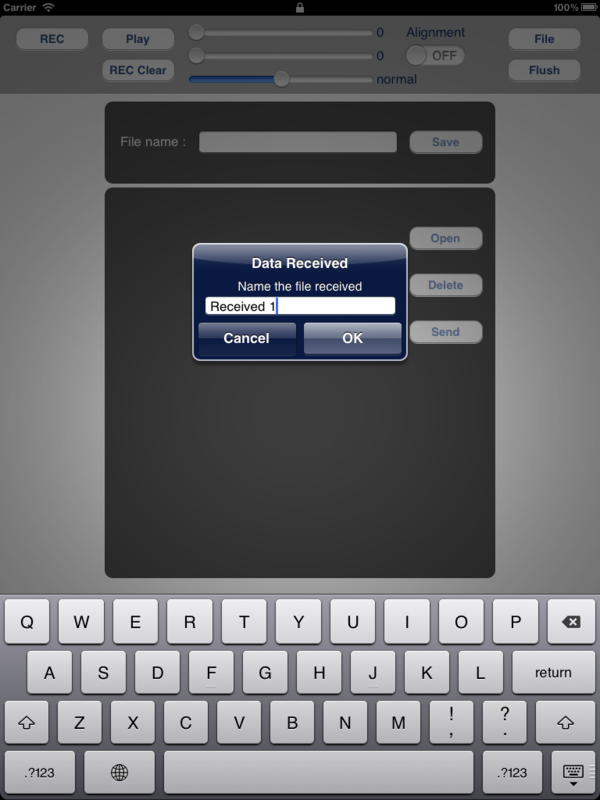
Tap the "Send" button.
Then this popup will be shown on the receiver.
Name the received file.
Clean up
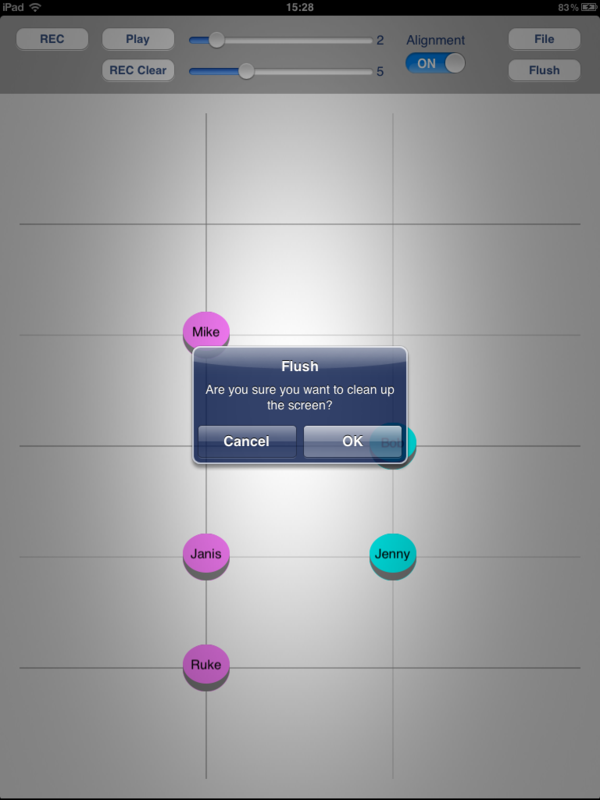
You will see this confirmation to use the "Flush" button.
This function deletes all figures and recordings at once.
It cannot be undone, so please be sure to save those into a file before you fire it.
At the last...
If you have any questions, please leave a comment.
New ideas for improvement are welcome!
I'm developing very slowly, though...
I hope you enjoy it!
PositionMakerユーザーマニュアル v1.1.0
ダウンロードありがとうございました!
一通りの使い方をまとめてみました。
何か分からないことや要望等があったら、コメントを残していただけるとありがたいです。
管理画面
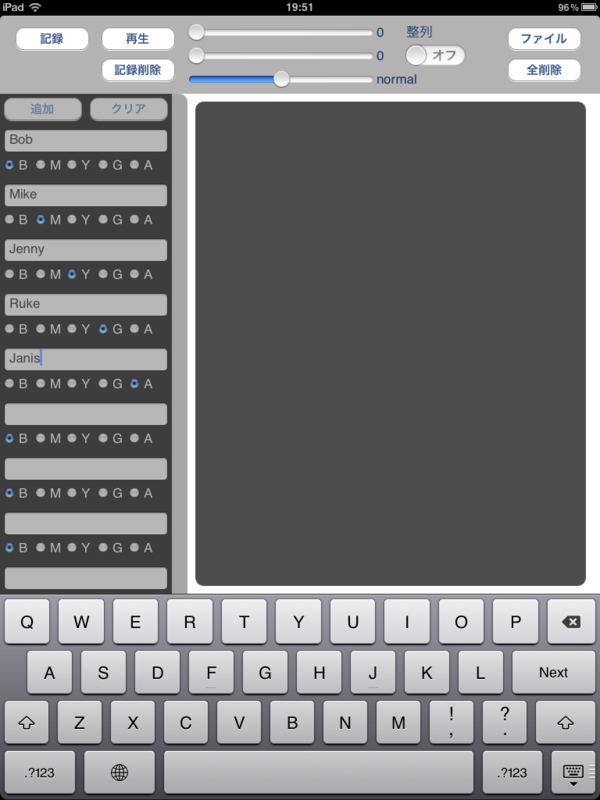
テキストボックスに名前を入力し、色を選び、追加ボタンをタップして下さい。
クリアボタンを押すと全ての名前がクリアされますのでご注意を。

メンバーを追加すると右側の画面にリストが表示されます。
リストからメンバーを削除するには、右端の赤いボタンをタップして下さい。
記録機能

記録機能を使ってみましょう。
管理画面でメンバーを追加すると画面右上に丸いオブジェクト(フィギュアと呼びます)が表示されます。
フィギュアには先程入力した名前が表示されています。

フィギュアを配置し、記録ボタンをタップして下さい。
それぞれのフィギュアの左下に数字が表示されます。
数字はそのフィギュアがいくつの位置を記録しているかを表しています。
Bobを真ん中へ移動すると、数字が増えるのが確認出来ます。

さらにBobとRukeを移動してみましょう。
最後にもう一度記録ボタンをタップし、再生ボタンをタップして下さい。
BobとRukeが記録した位置を順番に移動します。
画面中央上部の一番下のスライダーで移動する速さを調節出来ます。
整列機能

整列機能を使用すると直線上にフィギュアを配置出来ます。
画面中央上部のスライダーを動かし、いくつ線を引くか決めます。
上のスライダーは縦線、下のスライダーは横線の数を変更します。
その後、整列スイッチをタップしオンに切り替えて下さい。
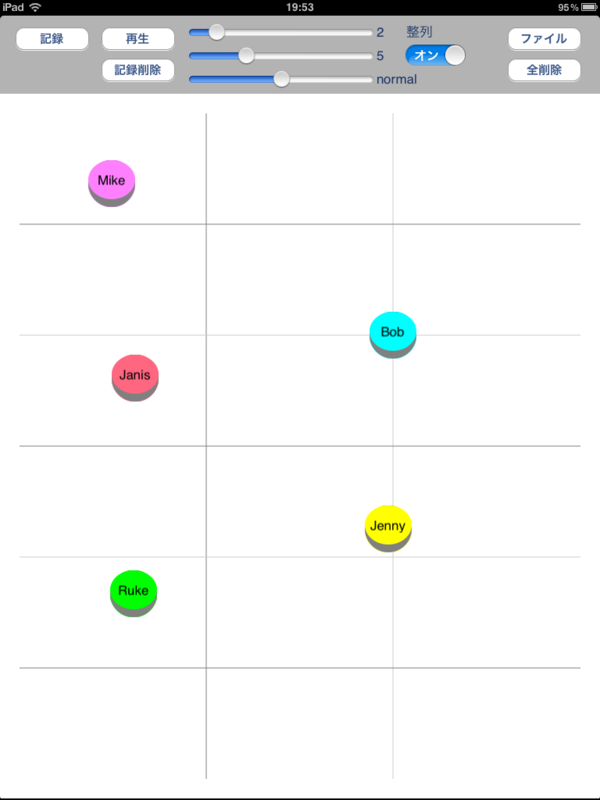
整列機能を確認する為にBobを動かしてみて下さい。
Bobが線の交点に配置されるはずです。
複数選択

たくさんのフィギュアを表示すると、移動するのが大変です。
複数のフィギュアを順番にタップし、ドラッグ&ドロップすることが出来ます。
選択されているフィギュアは色が濃くなります。
選択を解除するにはもう一度タップして下さい。
何もないところをタッチすると全ての選択が解除されます。
セーブ&ロード

画面右上のファイルボタンをタップすると、ファイルメニューが表示されます。
フィギュアの位置と移動の記録が保存出来ます。
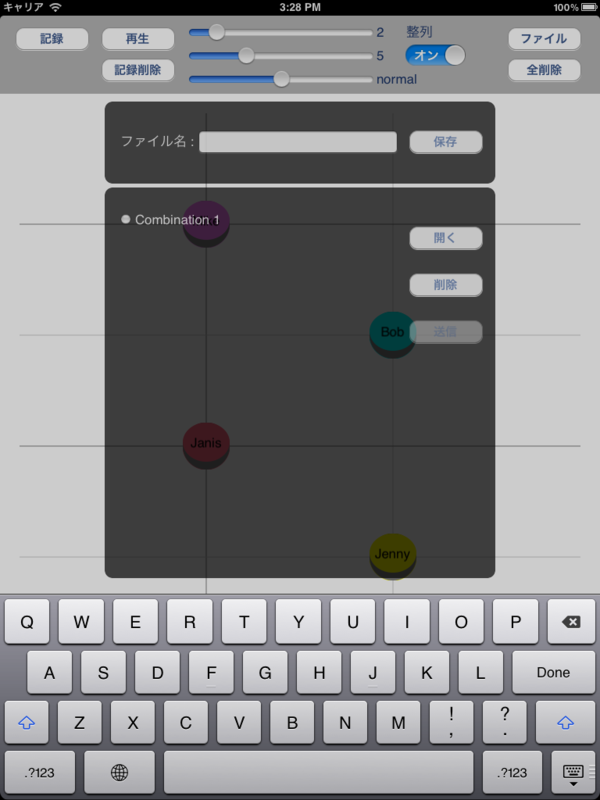
ロードするには記録されたファイルを選び、開くボタンをタップして下さい。
ファイルを削除する際は削除ボタンをタップします。
送信

v1.1.0からの新機能として、iOSの端末同士でファイルを送受信出来るようになりました。
※送受信機能を使う場合は、事前に設定->一般->Bluetoothをオンにして下さい。
近くにiOS端末が2台以上ある状態でそれぞれのファイルメニューを開きます。
しばらくすると送信ボタンがアクティブになります。
アクティブにならない場合はファイルメニューを開き直してみて下さい。

送信ボタンを押すと受信側でポップアップが出るので、名前を付けて保存して下さい。
最後に...
ここまで読んでいただき、ありがとうございます!
使い方が分からなかったり、機能の要望があればコメントを残してもらえるとありがたいです。
仕事の合間になってしまうのでレスは遅いかもですが、必ず目を通します。
すごくマニアックなアプリだと思いますが、何かの助けになれば幸いです。
PositionMakerユーザーマニュアル
ダウンロードありがとうございました!
一通りの使い方をまとめてみました。
何か分からないことや要望等があったら、コメントを残していただけるとありがたいです。
管理画面

テキストボックスに名前を入力し、色を選び、追加ボタンをタップして下さい。
クリアボタンを押すと全ての名前がクリアされますのでご注意を。

メンバーを追加すると右側の画面にリストが表示されます。
リストからメンバーを削除するには、右端の赤いボタンをタップして下さい。
記録機能

記録機能を使ってみましょう。
管理画面でメンバーを追加すると画面右上に丸いオブジェクト(フィギュアと呼びます)が表示されます。
フィギュアには先程入力した名前が表示されています。

フィギュアを配置し、記録ボタンをタップして下さい。
それぞれのフィギュアの左下に数字が表示されます。
数字はそのフィギュアがいくつの位置を記録しているかを表しています。
Bobを真ん中へ移動すると、数字が増えるのが確認出来ます。

さらにBobとRukeを移動してみましょう。
最後にもう一度記録ボタンをタップし、再生ボタンをタップして下さい。
BobとRukeが記録した位置を順番に移動します。
画面中央上部の一番下のスライダーで移動する速さを調節出来ます。
整列機能

整列機能を使用すると直線上にフィギュアを配置出来ます。
画面中央上部のスライダーを動かし、いくつ線を引くか決めます。
上のスライダーは縦線、下のスライダーは横線の数を変更します。
その後、整列スイッチをタップしオンに切り替えて下さい。

整列機能を確認する為にBobを動かしてみて下さい。
Bobが線の交点に配置されるはずです。
複数選択

たくさんのフィギュアを表示すると、移動するのが大変です。
複数のフィギュアを順番にタップし、ドラッグ&ドロップすることが出来ます。
選択されているフィギュアは色が濃くなります。
選択を解除するにはもう一度タップして下さい。
何もないところをタッチすると全ての選択が解除されます。
セーブ&ロード
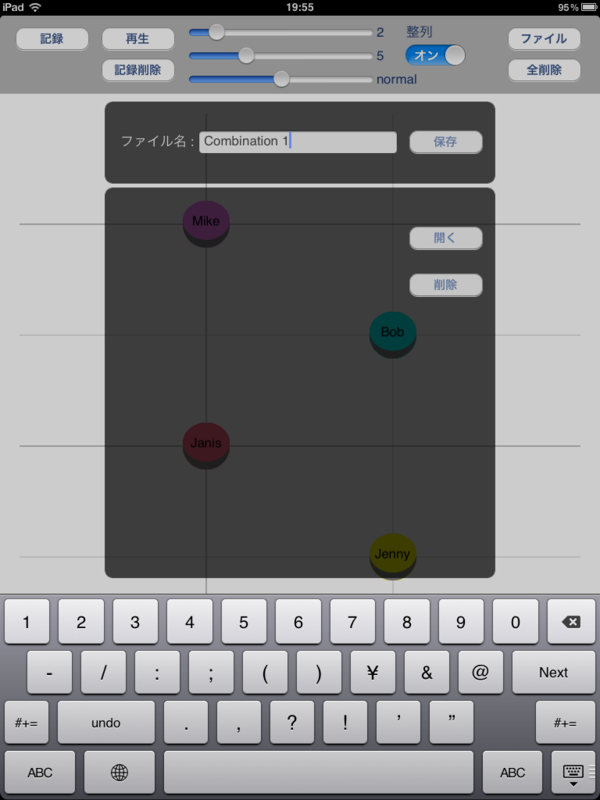
画面右上のファイルボタンをタップすると、ファイルメニューが表示されます。
フィギュアの位置と移動の記録が保存出来ます。

ロードするには記録されたファイルを選び、開くボタンをタップして下さい。
ファイルを削除する際は削除ボタンをタップします。
最後に...
ここまで読んでいただき、ありがとうございます!
使い方が分からなかったり、機能の要望があればコメントを残してもらえるとありがたいです。
仕事の合間になってしまうのでレスは遅いかもですが、必ず目を通します。
すごくマニアックなアプリだと思いますが、何かの助けになれば幸いです。
How to use PositionMaker
Thank you for downloading my app!
If you have any questions about my app and/or this article,
please feel free to leave comments.
Tutorial

This is a screenshot of what you see when the app is running. (maybe no vertical and horizontal lines)
Let's swipe the white area from the left end to the right. You'll see the "Management View".
Management View

Type out names, select colors, and then tap the "Add" button.
Please care to use The "Clear" button, that will erase all names you typed.

Once you add members, the right-hand gray view shows the list of members on it.
When you want to delete someone, just tap the red thing with white bar on the list.

To quit the "Management View", touch the light gray zone and swipe to the left.
Recording

Let's start recording.
You will see A round figure on the upper right.
Those figures are labeled as you type.

Drag and Drop those like this.

Then tap the "REC" button to start recording.
You'll find a number on the lower left of each figures.
Those numbers show "how many movements the figure has".
Let's drag Bob to the center, and check the number increases.

Again, drag/drop Bob and Ruke.
Finary, tap the "REC" button to stop recording and the "Play" button to see how it works.
Alignment

The alignment function is helpful if you want to align those figures on a line.
Drag the slider controller to decide how many lines you want.
The upper is for vertical lines, the other is for horizontal ones.
After that, tap the "Alignment" toggle switch to activate the alignment function.

It's easy to see the difference when you move Bob.
Bob might skip to the nearest intersection.
This is what the alignment function does.
Selecting multiple figures

Only one figure can be dragged at once? No way.
Just tap figures one by one, then drag/drop one of those.
Selected figures are grayed.
To cancel the selection, tap the figure you want to deselect.
Note that a tap on the empty space cancel all selections.

When you start dragging from the empty space, you can select by area.
Figures inside the rectangle with dashed line are going to be selected.
Save and load
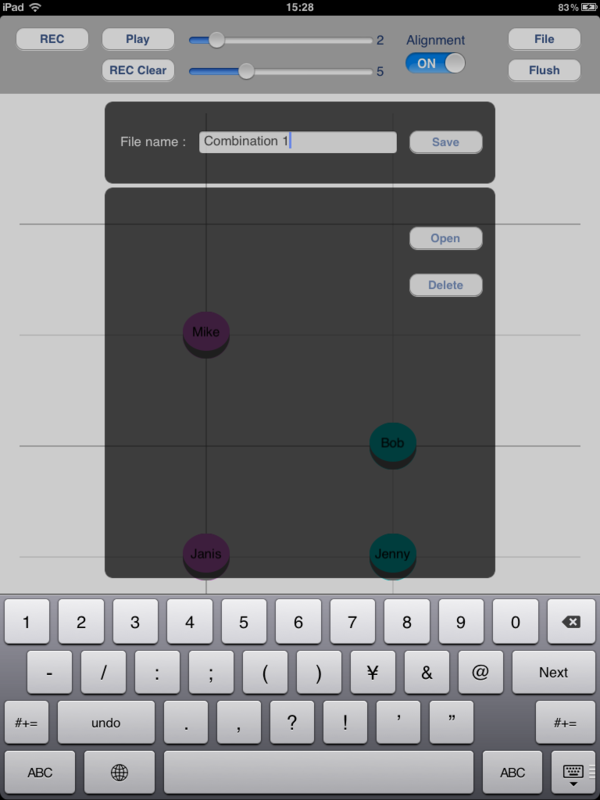
The "File" button on the upper right is to show the "File Menu View".
Names, positions and movements recorded will be saved.

To load a file, tap a file to select, then tap the "Open" button.
Use The "Delete" button to remove the file selected.
Clean up

You will see this confirmation to use the "Flush" button.
This function deletes all figures and recordings at once.
It cannot be undone, so please be sure to save those into a file before you fire it.
At the last...
If you have any questions, please leave a comment.
New ideas for improvement are welcome!
I'm developing very slowly, though...
I hope you enjoy it!


